BOOKIT- Mullion Mount Instructions
The BTX-BOOKITMM mullion mount (sold separately) requires a mullion with at least 2″ of depth and is designed for cables that have been run inside the mullion for access to the BookIT display.
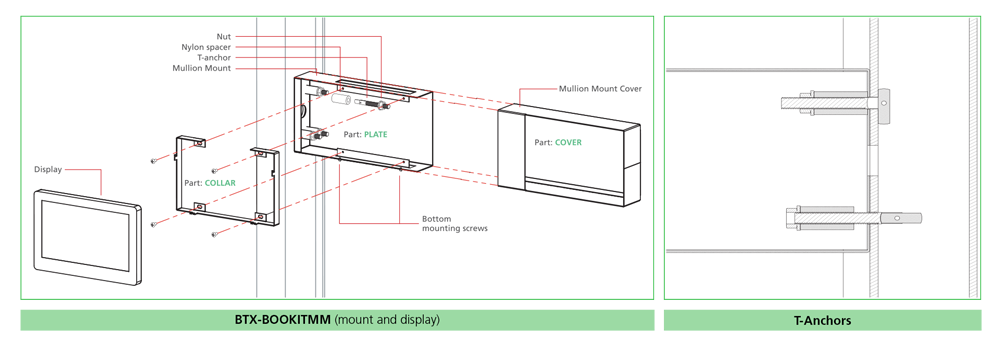
Installation Instructions:
- Using the included template, mark the four mounting holes and one cable access hole on the mullion.
- Drill four 5/16″ holes for the included T-anchors and drill one 3/4″ MIN (1″ MAX) hole for cable access.
- Feed your network cable into the mullion and through the cable access hole.
- Install the 1″ nylon spacers onto the T-anchors.
- Install the nuts onto the T-anchors (supplied) and keep the nut on the first few threads of the bolt.
- Hold the mullion mount back plate to the holes drilled into the mullion.
- Insert one of the prepared T-anchors into the mullion mount as shown in the diagram ensuring that the “T” mechanism drops down.
- Lightly grip the nylon spacer and pull back putting pressure on the T-anchor on the inside surface of the mullion.
- Using a 7/16″ deep socket on a universal joint or flexible socket extension, tighten the nut finger tight.
- Repeat this process for the remaining three T-anchors.
- Make sure the face of the mullion mount is plumb and secure the mullion mount using the 7/16″ socket to tighten the nuts on the T-anchors so that the mullion mount is secure against the mullion. Do not over-tighten.
- Slide the mullion mount cover onto the back plate until it is flush with the mullion face.
- Install the collar with the hooks facing up using the 4 6-32 x 5/16 screws (supplied).
- The mount can be installed in both the left or right face of the mullion. Simply make sure that the hooks on the mullion mount collar are facing upward before fastening to the plate.
- Plug the network cable into the BookIT display.
- Hang the unit on the mount on the mullion mount collar hooks.
- Secure the bottom mounting screws.